Saturday, March 9, 2013

Restrict accidental In-app purchase from your android phone.

Hey guys,

Today's post is for any one who has friends or kids who accidentally or purposefully buy in-app products on your smart phone. Of course you have to pay the credit card bills and you don't want un-necessary stuffs crowding your phones. So, what do you do? Simply add a pin for in-app purchase... No one can buy any thing unless of course you give them the pin.

To restrict In-App purchase:
  1. Open google Play on your phone.
  2. Press the menu button.
  3. Open Settings.
  4. Under "User Control". Tap on "Set or change PIN".
  5. It will ask you for a PIN. Enter the PIN.
  6. Re-enter PIN to confirm.
  7. In "Settings", Check the "Use PIN for purchases".
  8. And you are DONE!!!


After an in-app purchase is done however, you can however Cancel the transactions later on as well.
Within 15 minutes of the transaction do the following:
  1. Open the Google Play Store app on your device.
  2. Tap Menu > My Apps.
  3. Find the app you've purchased that you'd like to cancel and tap to open the details page.
  4. Within the 15 minutes, you will see the option to "Open" or "Refund" - tap "Refund" to cancel the order.

If you fail to cancel transaction within 15 minutes however, don't loose hopes... There is another way albeit a tedious one, as this one involves contacting the vendor.

  1. Sign in to your account at https://wallet.google.com/manage.
  2. Click View Order.
  3. At the top of the receipt, click Contact [Seller's Name].
  4. Select I'd like to request a refund or return an item from the Subject drop-down menu, and enter your message in the Message text box.
  5. Click Send email after you've provided the necessary details.


Tuesday, September 25, 2012

Install Signed APK file to device- offline mode


Requirement:
Install the device drivers. You can get the device drivers from the device's website.
Once it is installed, perform the following steps:


On Device:

Drag down the “notification bar”.
Click the “USB connected” notification.

This warning may or may not occur.
On PC:


Create Folder “Android APK” (or whatever you want to name it.)
Copy the given APK in this folder.
Close this window.


On device:
Turn off the USB storage mode.


Open the file browser. The default location will be “mnt/sdcard”, if not, navigate to this location and open the folder you just made.


Open the file and click “Install”. If it is already present, it will ask to re-Install/Overwrite the current APK. You may un-install the previous version from Menu-> Settings->Apps-> <Your application name>-> Uninstall.


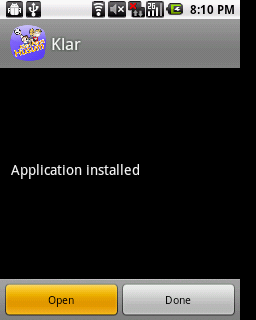
Once it is done, you can either click on “Done” then navigate back to main menu screen and select the application you just installed from the "Installed Apps" screen (Menu) OR click “Open” and open the application directly.


Sunday, August 19, 2012

Block all calls programmatically


Block all calls
Requirement:
Block incoming and out going calls.

Steps:
Register a broadcast receiver to monitor calls.
In AndroidManifest.xml file write:
<receiver android:name="MyPhoneReceiver">
    <intent-filter android:priority="100">
        <action android:name="android.intent.action.PHONE_STATE"/>
        <action android:name="android.intent.action.NEW_OUTGOING_CALL"/>
    </intent-filter>
</receiver>

Create a broadcast Receiver to catch the "call" related broadcast.

public class ProcessCall extends BroadcastReceiver { 
 @Override 
 public void onReceive(Context context, Intent intent) { 
  //Create object of Telephony Manager class. 
  TelephonyManager telephony = (TelephonyManager)  context.getSystemService(Context.TELEPHONY_SERVICE); 
  //Assign a phone state listener. 
  CustomPhoneStateListener customPhoneListener = new CustomPhoneStateListener (context); 
  telephony.listen(customPhoneListener, PhoneStateListener.LISTEN_CALL_STATE); 
 } 
} 
Create a custom phone state listener.
import java.lang.reflect.Method; 
import android.content.Context;
import android.telephony.PhoneStateListener;
import android.telephony.TelephonyManager;
import com.CallLogApp.helper.BlockNumberHelper;
import com.CallLogApp.util.UDF;
import com.android.internal.telephony.ITelephony;
 
 
public class CustomPhoneStateListener extends PhoneStateListener {
 Context context; 
  
 public CustomPhoneStateListener(Context context) { 
  super(); 
  this.context = context; 
 } 
  
 @Override 
 public void onCallStateChanged(int state, String callingNumber) 
 { 
  super.onCallStateChanged(state, callingNumber); 
  switch (state) { 
    case TelephonyManager.CALL_STATE_IDLE: 
    break; 
    case TelephonyManager.CALL_STATE_OFFHOOK: 
    //handle out going call
     endCallIfBlocked(callingNumber); 
    break; 
    case TelephonyManager.CALL_STATE_RINGING: 
    //handle in coming call
     endCallIfBlocked(callingNumber); 
    break; 
    default: 
    break; 
   }  
  } 
 
 private void endCallIfBlocked(String callingNumber) { 
  try { 
 
   // Java reflection to gain access to TelephonyManager's 
   // ITelephony getter 
   TelephonyManager tm = (TelephonyManager) context.getSystemService(Context.TELEPHONY_SERVICE); 
   c = Class.forName(tm.getClass().getName()); 
   Method m = c.getDeclaredMethod("getITelephony"); 
   m.setAccessible(true); 
    com.android.internal.telephony.ITelephony telephonyService = (ITelephony) m.invoke(tm);
   telephonyService = (ITelephony) m.invoke(tm); 
   //
    telephonyService.silenceRinger(); 
    telephonyService.endCall(); 
  } catch (Exception e) { 
   e.printStackTrace(); 
  } 
 }
} 

Step-by-Step Android setup.

Hi guys,

This is just the basic start up session. Following are the steps to setup Android environment in your computer.

System Requirements:

To start with, let's check if your system is eligible to setup the environment or not.

  • Windows XP (32-bit), Vista (32- or 64-bit), or Windows 7 (32- or 64-bit)
  • Mac OS X 10.5.8 or later (x86 only)
  • Linux (tested on Ubuntu Linux, Lucid Lynx)
    • GNU C Library (glibc) 2.7 or later is required.
    • On Ubuntu Linux, version 8.04 or later is required.
    • 64-bit distributions must be capable of running 32-bit applications.
If you have at least one of the above then BINGO! you can start with the installation process below.

Installation Process:


To start with Android development, you need to install the following:


  1. Latest JDK. Please select a suitable one from here. JRE alone is not sufficient.
  2. Download the android SDK from here.
  3. From the list of platforms on right side, choose the suitable one and download the ECLIPSE environment. We will be using Eclipse environment to write our code.

Installing ADT


To configure Eclipse for Android development, we need to install the ADT.

  1. Start Eclipse, then select Help > Install New Software.
  2. Click Add, in the top-right corner.
  3. In the Add Repository dialog that appears, enter "ADT Plugin" for the Name and the following URL for the Location:
    https://dl-ssl.google.com/android/eclipse/
  4. Click OK.
    Note: If you have trouble acquiring the plugin, try using "http" in the Location URL, instead of "https" ('https' is preferred for security reasons).
  5. In the Available Software dialog, select the checkbox next to Developer Tools and click Next.
  6. In the next window, you'll see a list of the tools to be downloaded. Click Next.
  7. Read and accept the license agreements, then click Finish.
    If you get a security warning saying that the authenticity or validity of the software can't be established, click OK.
  8. When the installation completes, restart Eclipse.
If you have any problem in the above process:

  1. Download ZIP format of the ADT plugin (ADT-20.0.3.zip) from here. Do not un-zip it.
  2. Start Eclipse, then select Help > Install New Software.
  3. Click Add, in the top-right corner.
  4. In the Add Repository dialog, click Archive.
  5. Select the downloaded ADT-20.0.3.zip file and click OK.
  6. Enter "ADT Plugin" for the name and click OK.
  7. In the Available Software dialog, select the checkbox next to Developer Tools and click Next.
  8. In the next window, you'll see a list of the tools to be downloaded. Click Next.
  9. Read and accept the license agreements, then click Finish. (If you get any security warning, just hit "OK").
  10. When the installation completes, restart Eclipse.


Configure ADT:

After you have installed the ADT, after Eclipse re-starts, you now need to specify the location of Android SDK directory. 

  1. Select Window > Preferences... to open the Preferences panel (on Mac OS X, select Eclipse > Preferences).
  2. Select Android from the left panel.
  3. For the SDK Location in the main panel, click Browse... and locate your downloaded Android SDK directory (which would be some thing like "android-sdk-windows").
  4. Click Apply, then OK.

Updating ADT:

  1. Select Help > Check for Updates. If you have installed the latest plug-in, you will get a dialog box and you are done.
  2. If there are updates available, select Android DDMS, Android Development Tools, and Android Hierarchy Viewer, then click Next.
  3. In the Update Details dialog, click Next.
  4. Read and accept the license agreement and then click Finish. This will download and install the latest version of Android DDMS and Android Development Tools.
  5. Restart Eclipse.
You have now successfully completed setting up the Android environment!!! 

You can now start your first android project by referring to this code.


UPDATE:

You can update the ADT using the SDK Manager.
Under the "Sort By" select API Level.
In the list of available, installed, obsolete packages, under TOOLS check Android SDK Tools and Android SDK Platform-Tools and Install Packages...
You will now have the latest ADT installed. After updating the ADT, you can update the latest JellyBeans version(4.2)!!!


The android developer site is the best guide for beginners.